 This is Part-2 of a four-part series on how to setup FeedBurner for your WordPress blog.
In Part-1 of this series, I showed you how to migrate your RSS Feed to Feedburner. Setting up your RSS Feed is one of the first things you should do when you start blogging.
Email Subscription for Your Feed
The next step is to integrate email subscription with FeedBurner, so when your posts are published readers will get a copy of your post in their inbox or RSS Reader. It allows you to let your current readers know you have new content published, get new readers, and build traffic to your site. Without letting readers know you’ve published new posts, why would they be interested in your site?
This is a 2 step process, (1) setting up the subscription service in FeedBurner, and then (2) integrating a FeedBurner subscription link into your blog. In this post I’ll show you the basics to get this done. In this tutorial series we’ll look at one of my previous sites, The Web Ninja, as an example.
Note: In order to follow this tutorial, you will either need to have a theme that has built in functionality for FeedBurner and RSS Subscriptions. If your theme doesn’t support subscriptions, then you can download the FREE Subscription Options plugin (or install it from the plugins page).
Step 1: Login to FeedBurner
Login to FeedBurner at the login page: feedburner.google.com
Even if you have a Google account, this is a faster way to get to FeedBurner. Once you login, you should see the new feed you setup in Part-1. Simply click on the Feed.
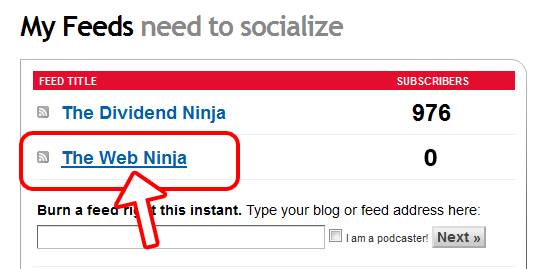
Step 2: Activate Email Subscription
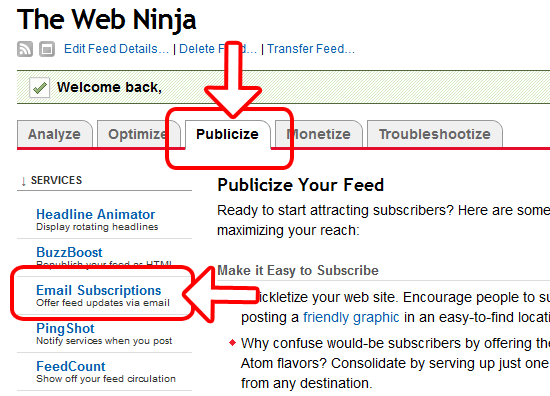
Next, click on the Publicize tab, and then click on Email Subscriptions, as shown below:
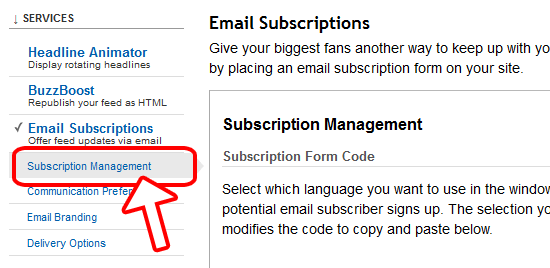
Then click on Subscription Management:
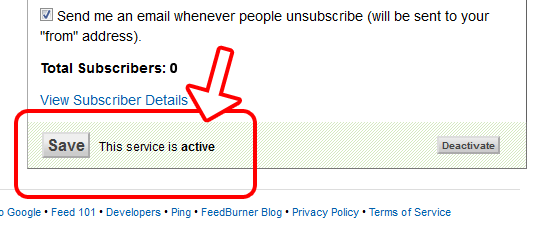
Now, scroll down to the bottom of the page and click on the Activate button:
Important!
Make sure you click on the Activate button, when you’re done, or your feed will not be delivered. In my example it shows a Save button as the service is already activated. But in your case you will see an Activate button.
Step 3: Setup Delivery Options
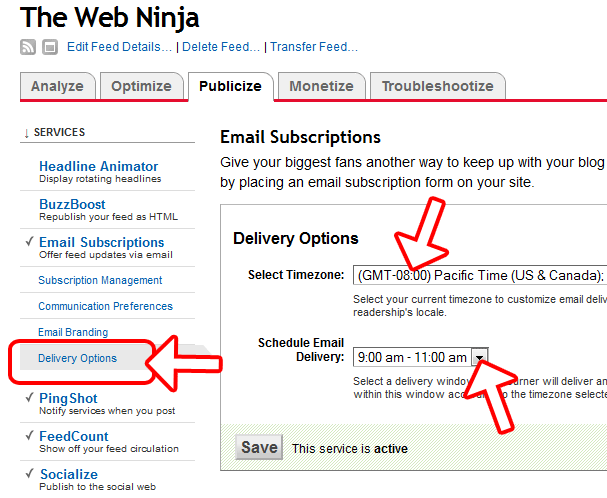
The next step is to setup the delivery options, or in plain English – when we deliver the feed to our readers. With the Publicize and Email Subscription area still open, now click on Delivery Options.
You will see the following dialog box. Set the time zone for your area, and choose a time you would like to send your feed. I recommend using a time between 9am to 1pm your local time. Or, if you have Google Analytics data, you can select a time zone that most of your readers reside in.
Important!
Make sure you click on the Activate button, when you’re done, or your feed will not be delivered. In my example it shows a Save button as the service is already activated. But in your case you will see an Activate button.
Step 4: Get the RSS Feed URL
Getting the FeedBurner service activated for email subscriptions is great. But it’s not going to do much, unless you can get people to sign up from your blog. The RSS Feed URL is a link to your RSS feed, usually with a big orange RSS icon. This allows people with all different kinds of RSS readers (as well as email), to subscribe to your blog.
Here is the RSS Feed URL for Web Design Fact:
http://feeds.feedburner.com/WebDesignFact
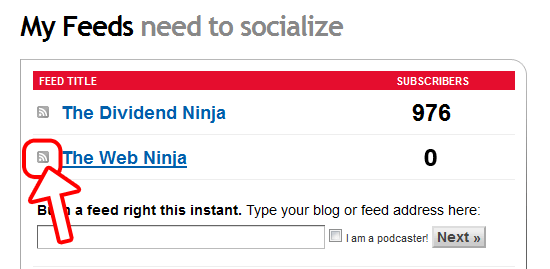
To get the RSS Feed URL, simply click on the menu option My Feeds at the top of the page. Then, click on the grey coloured RSS icon. This will open the RSS Feed URL in a new window. This URL is your RSS Feed URL. Copy and save it!
Step 5: Get the RSS Email URL
On many blogs you will notice an email icon beside the big orange RSS icon. This is the standard icon that means “subscribe to my blog with email”. It does not mean “contact me by email” as many new bloggers may assume. It’s a good idea to enable email subscription easily to your feed, as most people will read your feed via email.
With the same window open as in Step-4, click on your Feed Title (i.e. The Web Ninja). Then click on the Publicize Tab, and the Email Subscriptions tab, just like in Step-2.
Scroll past the first box of code, called the Subscription Form Code, since you don’t need it. The lower box is the Subscription Link Code which is what you need.
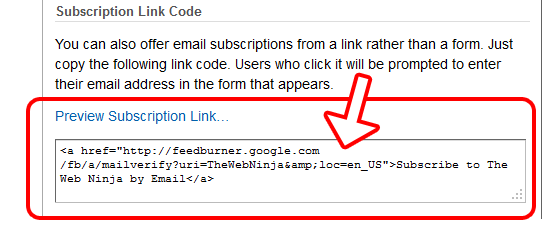
What you are looking for is everything in between the quotes of the href tag. So in the above example the link you would need is:
http://feedburner.google.com/fb/a/mailverify?uri=TheWebNinja&&loc=en_US
This is your RSS Email URL. Copy and save this link!
Step 6: Put the Code Into Your Blog
You should now have two links saved, the RSS Feed URL from Step-4, and the RSS Email URL from Step-5.
Now you are going to login to your WordPress Dashboard.
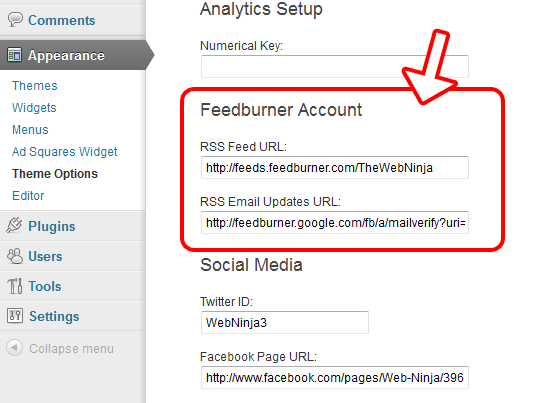
Most WordPress themes now come with the ability to paste these URLs into the Theme Options. The theme I used for the Web Ninja for example, already had this functionality built in. I simply went to Appearance and Theme Options, and pasted in my RSS Feed and RSS Email URLs into the corresponding fields (see pic below – your theme may be different).
Using the Subscription Options Plugin
But not everyone has a theme with RSS Feeds already enabled. If your theme doesn’t support subscriptions, then you can download the FREE Subscription Options plugin (or install it from the plugins page). This will allow you to use a sidebar widget, and put your RSS Feed URL and RSS Email URL right into your theme. It’s an awesome and simple to use plugin, which also allows you to add Facebook and Twitter as well! In addition you can adjust the icon size and change the background color. (If you like the plugin please remember to make a donation and support the developer).
Simply go to your WordPress Dashboard, and then click on Plugins and Add New. Type Subscription Options in the search field, and install the plugin.
Once you install the Subscription Options plugin, it is very simple to use! Simply navigate to Appearance and then Widgets. Just drag the Subscription Options box into the top of your sidebar. Then simply paste your RSS Feed URL and RSS Email URL into the corresponding fields.
Voila! Your readers will now be able to subscribe to your blog, and get your posts when they are published. More importantly you will start being able to build your subscriber base, start interacting with readers through comments, and get people interested in your blog!
If you missed Part-1, be sure to check it out. In Part-3 of this series, I’ll show you how to link your RSS Feed to Twitter, as well as some additional optimization tips. Stay tuned!
© 2012 to 2014 by Avrom Digance. All Rights Reserved.

1 thought on “How to Setup FeedBurner: Part-2”
Comments are closed.